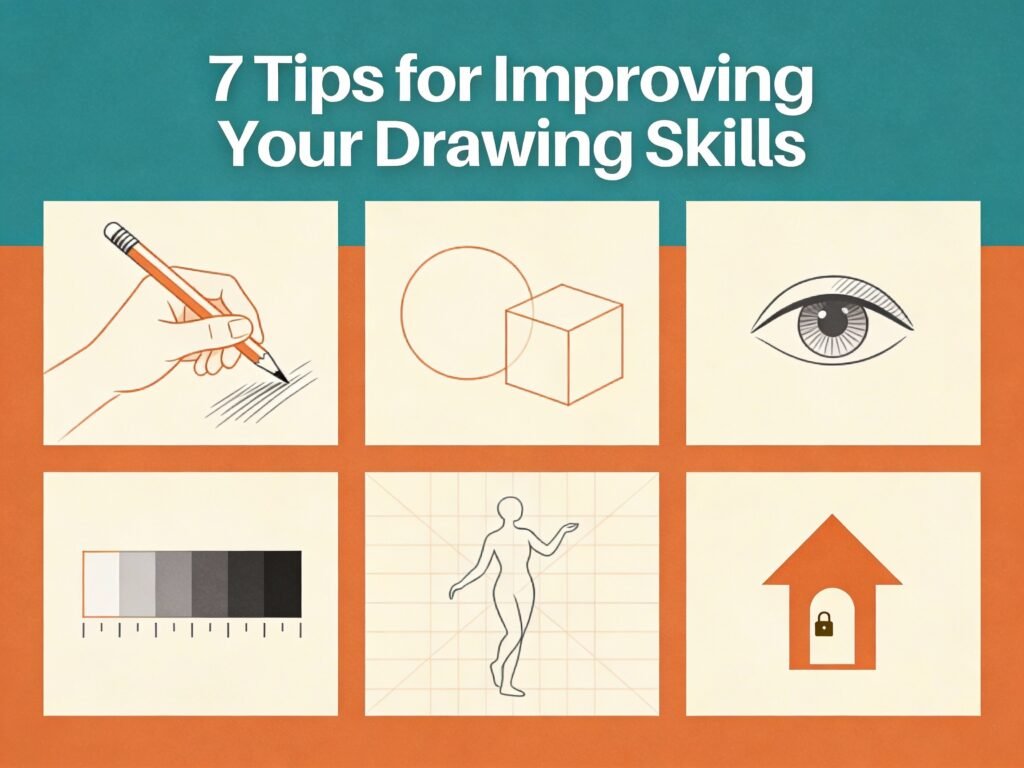
Drawing is a skill that improves with intentional practice, not just time spent at the sketchpad. Whether you’re learning to draw anime characters, realistic portraits, or landscapes, the fundamental principles remain the same. In this guide, we’ll explore seven proven strategies that can transform your drawing journey and help you break through plateaus.
1. Master the Fundamentals Through Focused, Purposeful Practice
“Practice makes perfect” is outdated advice. The reality is: practice with purpose makes progress.
Simply sketching aimlessly for hours won’t move you forward. Instead, identify the specific skill you want to improve—whether it’s anatomy, perspective, line quality, or shading—and dedicate focused sessions to that single element.
How to practice with purpose:
- Choose one drawing fundamental per practice session (e.g., “Today I’m working on hand anatomy only”)
- Set a timer and commit to focused time (30-45 minutes)
- Study the chosen element using references before you draw
- Track what improves and what still needs work
- Avoid the temptation to add unnecessary details that distract from your learning goal
For example, if you’re learning poses, draw different body positions without adding hair, facial features, or clothing. This removes visual noise and lets your brain concentrate on capturing movement and balance. Your brain learns faster when it’s not juggling multiple complex tasks simultaneously.
2. Build Strong Foundational Skills: Line Quality and Mark Making
Before you can draw complex subjects, you need control over the most basic tool: your pencil. Professional artists emphasize that line quality and mark-making confidence form the foundation of all drawing.
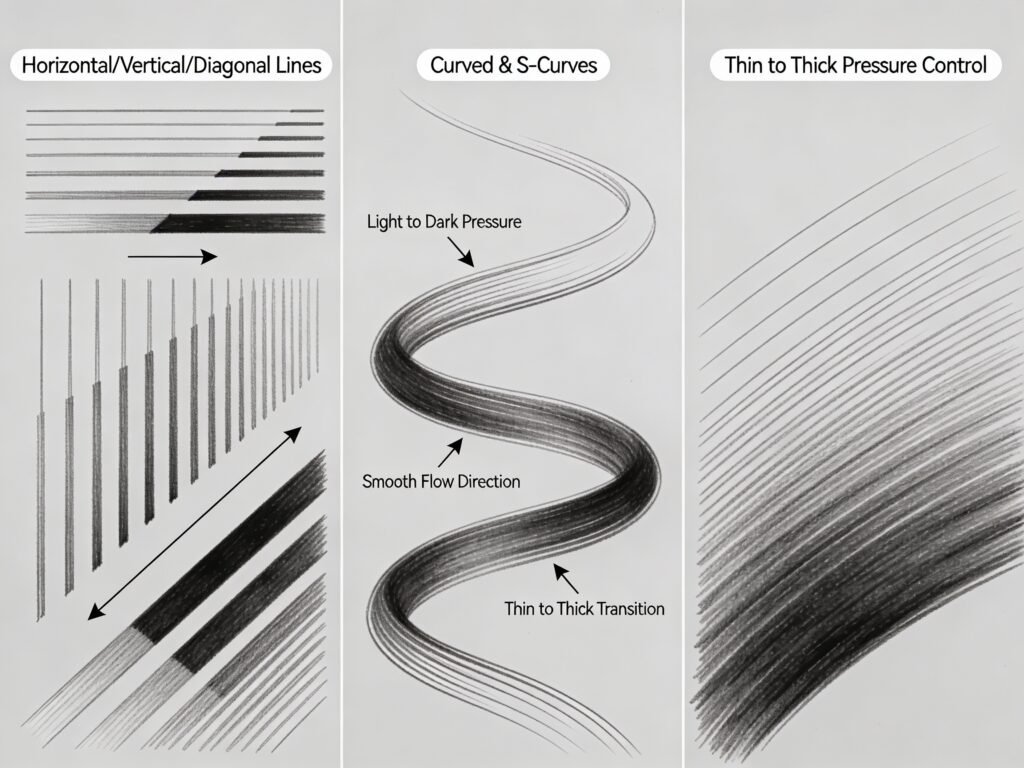
Three essential mark-making exercises:
Exercise 1: Line Variations
Draw a full page of horizontal, vertical, and diagonal lines in different lengths (short, medium, long). Vary the pressure you apply—light whisper-thin lines, medium pressure, and bold dark strokes. This trains your hand-eye coordination and gives you control over the mark you create.
Exercise 2: Curved Lines and S-Curves
Practice smooth, continuous curves in single strokes. Draw flowing S-lines by placing dots and connecting them in one fluid motion. Try this with varying pressure levels (light to dark). This exercise develops the dexterity needed for contour drawing and character outlines, which are essential in anime art.
Exercise 3: Pressure Control
Experiment with gradual pressure changes within a single line. Start with light pressure and gradually increase to maximum pressure, creating a line that transitions from thin to thick. This mimics the dynamic line work you see in professional anime and manga art.
Practice these exercises for 10-15 minutes daily. You’ll notice significant improvement in line confidence within two weeks.
3. Understand Observation Over Imagination: Train Your Eye Before Your Hand

Drawing is 50% observation and 50% knowledge. Your eye must be trained to see accurately before your hand can represent what you see.
Many beginners draw what their brain thinks something looks like rather than what they actually see. This is why characters often look stiff, proportions feel off, or “something feels wrong” even though you can’t pinpoint the issue.
Build observational skills with these practices:
Blind Contour Drawing
Place an object in front of you (hand, shoe, plant, face). Without looking at your paper, draw the outline of the object while looking only at the subject. Let your pencil trace the contours continuously without lifting. Your hand follows your eye’s movement. The goal isn’t a perfect drawing—it’s training your eye-hand connection and improving accuracy.
Negative Space Drawing
Instead of drawing the object itself, draw the empty space around and within it. Your brain finds this approach counterintuitive, which forces you to see shapes objectively rather than relying on predetermined ideas of what something “should” look like. This technique is particularly powerful for improving proportions in portrait and figure drawing.
Mindful Observation
Before drawing, spend 2-3 minutes observing your subject without sketching. Note textures, light patterns, angles, and subtle details. Study how light falls on surfaces and creates shadows. This intentional observation rewires your brain to notice details automatically.
These exercises directly improve your ability to see proportions, angles, and spatial relationships—skills that transfer to all drawing subjects, from anime characters to realistic portraits.
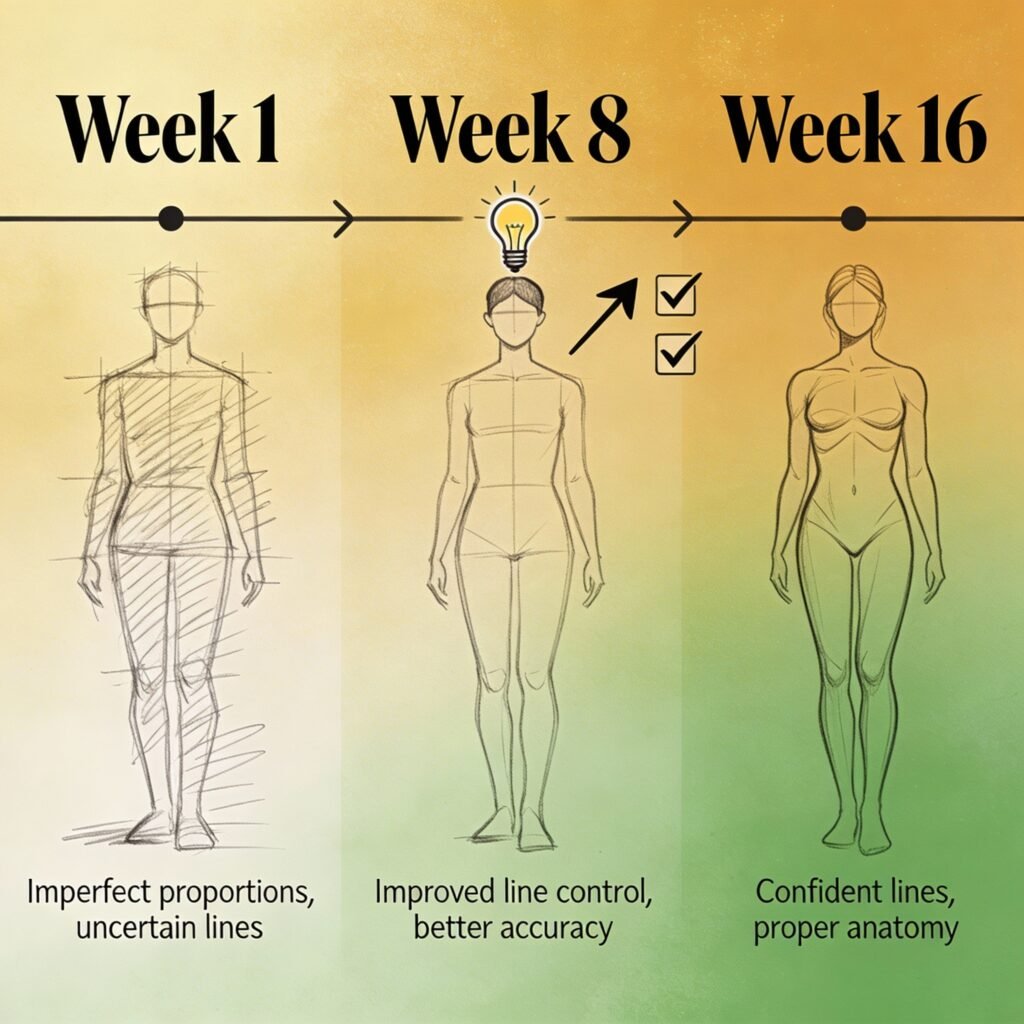
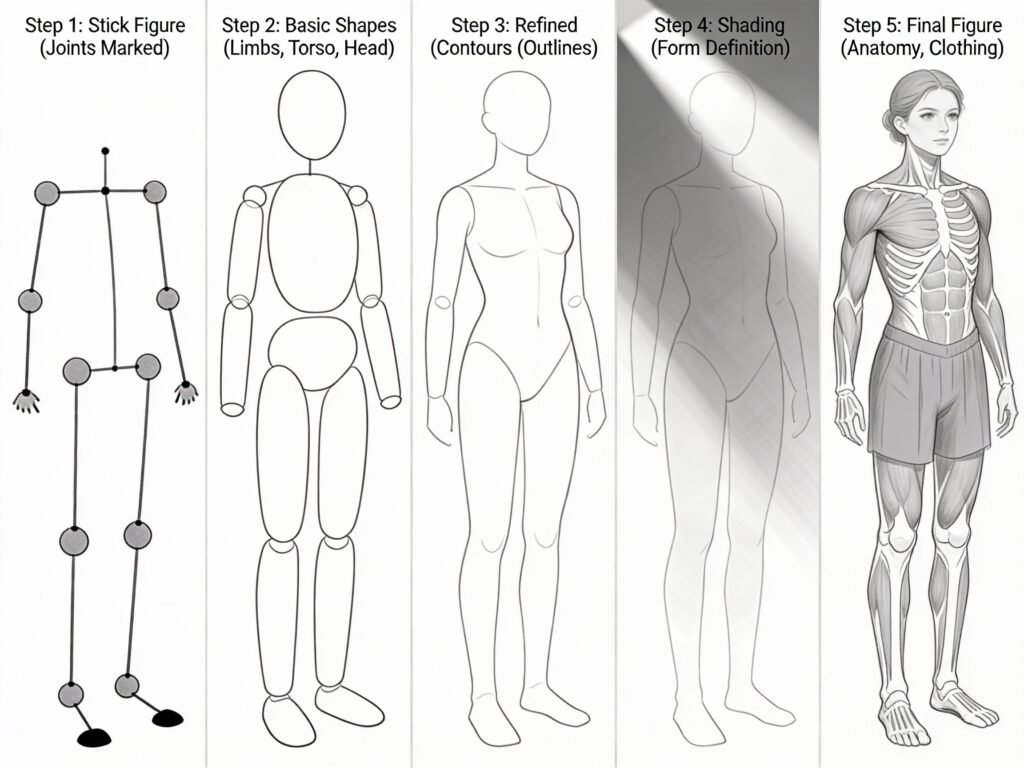
4. Learn to See in Basic Shapes: Structure Before Detail
One of the most common beginner mistakes is diving into details too early. Artists who start adding hair, eyes, and facial features before establishing the basic head structure end up with misaligned features and broken proportions.
The professional approach is simple: always work from general to detail.
The basic shapes method:
- Start with simple geometric forms (circles, rectangles, cylinders, ovals) to block out the overall structure
- Establish proportions and placement before adding refinement
- Refine the basic shapes into more realistic outlines
- Add volume and form through shading
- Layer in details (texture, features, expression)
For figure drawing:
Begin with a stick figure or bone structure to establish pose and proportions. Then add simple cylindrical and oval shapes for limbs and torso. Only once you’re satisfied with the structure do you refine the contours and add anatomical details.
For portrait drawing:
Start with a basic circle for the head, then divide it with simple lines to establish proportions (eye line, nose line, mouth line). Add guidelines for face structure. Then refine into realistic contours. Finally, add facial features and details.
This method prevents costly mistakes and makes complex subjects less intimidating. It also accelerates your learning because you’re building a clear mental map of structure.
5. Study Anatomy and Reference Materials: Learn from Real and Professional Sources
You cannot learn anatomy without references. Period. Even professional artists with decades of experience use references.
References aren’t shortcuts—they’re essential learning tools. When you study anatomy, you’re training your brain to understand how the body is structured, how muscles interact, and how the body moves in different poses.
How to use references effectively:
Study, don’t copy: Look at a reference image and analyze it. What’s the underlying structure? How do the muscles interact? Then put the reference aside and draw from memory or imagination. This is how your brain learns to internalize the information.
Break anatomy into manageable sections: Don’t try to master the entire human body at once. Start with large muscle groups (chest, abdomen, thighs). Progress to smaller, more complex areas (hands, facial muscles) as you build confidence.
Create reference sheets: Draw the same element (eyes from different angles, hand positions, poses) multiple times. Repetition builds muscle memory and reinforces understanding.
Study different art styles: If you’re learning anime art, study how professional anime artists simplify anatomy. If you’re learning realistic portraiture, study anatomically detailed references. Different styles emphasize different elements, and understanding multiple approaches deepens your knowledge.
Draw from life when possible: Drawing real objects, people, and landscapes is more challenging than drawing from photos, but it forces you to observe more carefully and trains your eye faster.
6. Master Perspective, Light, and Value: The Invisible Skeleton of Strong Drawings
Three foundational concepts separate amateur from professional work: perspective, light, and value.
Perspective creates the illusion of three-dimensional space on a flat surface. Without perspective, drawings look flat and unconvincing, no matter how well-rendered the details are.
Light and shadow (value) create the sense of form and depth. Drawings without proper value shading look incomplete and two-dimensional.
How to improve each:
Perspective:
- Understand vanishing points and how parallel lines converge toward them
- Practice drawing objects from different angles: bird’s-eye view, worm’s-eye view, side angles
- Challenge yourself with unusual perspectives (steep angles, extreme foreshortening)
- Use perspective guidelines lightly in your sketches until you internalize the concept
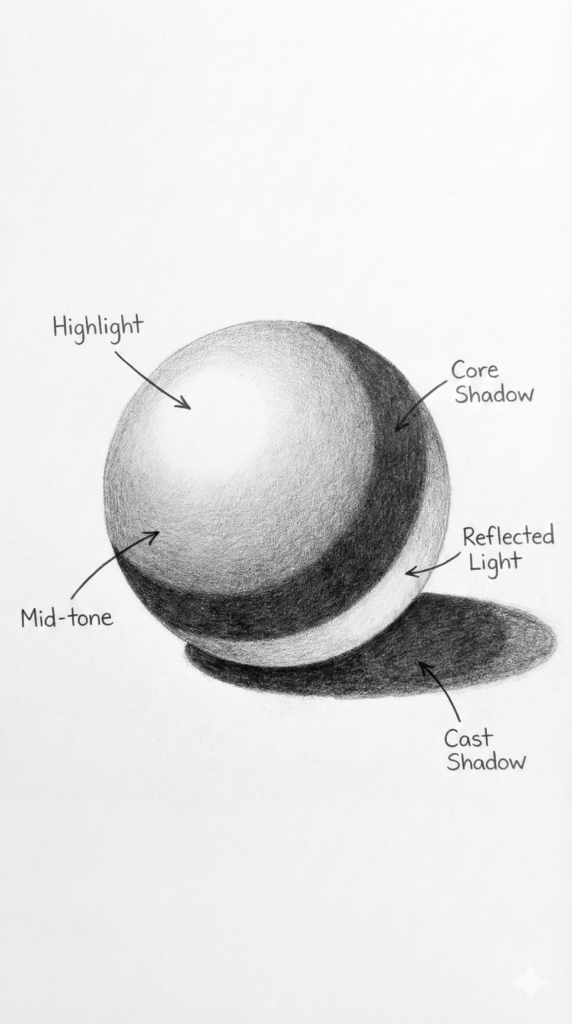
Value and Shading:
- Practice creating a value scale with one pencil: aim for 6-8 distinct tones
- Squint at your reference image to simplify values into basic shapes
- Study how light falls on form: light, midtone, and shadow areas
- Practice hatching and cross-hatching techniques for texture and depth
- Remember: color theory comes later; master value first
Practical exercise: Draw simple forms (sphere, cube, cylinder) with a single light source. Focus entirely on accurate shading. This exercise alone, practiced consistently, will dramatically improve your work.
7. Embrace a Growth Mindset: Mistakes Are Data, Not Failure
The difference between artists who improve rapidly and those who plateau is mindset.
Mistakes aren’t failures—they’re learning opportunities. Every “bad” drawing teaches you something about what doesn’t work. Professional artists analyze their unsuccessful work, identify what went wrong, and adjust their approach on the next attempt.
Cultivate a growth mindset by:
Analyzing mistakes specifically: Instead of saying “this drawing looks bad,” identify the exact issue: “The proportions of the head are too wide compared to the shoulders” or “The light direction is inconsistent—shadows don’t match the light source.”
Focusing on one problem at a time: If you notice multiple issues, choose one to fix in your next attempt. This prevents overwhelm and ensures real improvement.
Celebrating incremental progress: Compare your current work to pieces from six months ago. You’ll see improvement you might not notice in day-to-day practice.
Being open to feedback: Listen to constructive criticism without defensiveness. Ask specific questions: “What feels off about the proportions?” or “Does the perspective read clearly?” Feedback accelerates learning.
Maintaining consistent practice: Research shows that daily practice, even for 20-30 minutes, produces better results than sporadic long sessions. Build drawing into your daily routine—make it as habitual as brushing your teeth.
Bringing It All Together: Your Drawing Improvement Plan
Improving at drawing doesn’t require talent—it requires intention. Here’s how to apply these seven tips:
Week 1-2: Build your mark-making foundation
- Practice line exercises daily (10 minutes)
- Work on pressure control and line variation
- Start a consistent practice habit
Week 3-4: Develop observation skills
- Add blind contour drawing and negative space exercises
- Study references actively
- Continue line practice
Week 5-6: Master basic shapes and structure
- Practice drawing simple forms with correct perspective
- Work on value and shading with basic shapes
- Begin figure drawing with basic shapes method
Ongoing:
- Choose one fundamental per week and dedicate focused sessions to it
- Maintain a sketchbook of studies and observations
- Review your work regularly and identify specific areas for improvement
- Remember that every professional artist started as a beginner who didn’t give up
The path to better drawing is clear: practice with purpose, study fundamentals, observe carefully, understand structure, learn from references, master the invisible skills (perspective and value), and maintain a growth mindset.
Your future self—the one who can draw fluently and confidently—is waiting on the other side of consistent, intentional practice. Start today.
What’s one drawing skill you want to improve this week? Drop it in the comments—I’d love to know what you’re working on!
Need to improve your Drawing Skills? Look at our various courses offered at Konsult Creative Education – Online and at the Centre. Call for free counselling on +91 9902739994